It’s here, and it’s way better than Eureka. As soon as patch 5.35 hit, The Bozjan Southern Front was swarming with adventurers eager to assist the Resistance efforts and fight the Garlean forces. This area serves as Shadowbringers’ version of Eureka, but with many quality of life improvements. You’ll use this content to upgrade your level 80 Resistance Weapon, obtain cool cosmetics, and you can even level up your alt Jobs here from level 71-80.
It’s clear the developers listened to player feedback because the experience here is much smoother and simply put, more fun. You can use mounts right away, you can use the special Lost Actions almost immediately, and Critical Engagements are more accessible and entertaining than the Notorious Monster fights in Eureka.
I pretty much haven’t done anything in game except The Bozjan Southern Front for the last few days, so hopefully I can pass on some useful information I’ve picked up. I’ve found it really enjoyable so far, and the story has my full attention. I can’t wait to see what they add later, but for now, here’s what you need to know to get started.
Unlocking Bozjan Southern Front
In order to join in on this content, you’ll need to have completed the Shadowbringers MSQ. You’ll then need to begin the Resistance Weapons questline, which in turn requires you to have done the level 70 Alliance Raids questline (also known as the Ivalice Raids).
Once that’s all done, you can unlock the Bozjan Southern Front with the Resistance Weapons Quest ‘Where Eagles Nest‘ in Gangos.
You can enter an instance of The Bozjan Southern Front as a party or solo, and you can join and leave parties while inside the instance as well. An instance can hold 72 players, and you can enter as (or switch to) any Job that is level 71 or higher. If your Job is level 80, you’ll receive endgame Tomestones of Revelation from your activities inside. If your Job is not yet max level, you will instead receive experience.
Since the Armory Bonus experience is lessened above level 70, and levelling through dungeons slows a little for those last 10 levels, I think it’s great that they’ve added another piece of interesting content to help you finish maxing your alternate Jobs.
Quickstart Guide
Follow the questline whenever a new quest is available.
Participate in Skirmishes and Critical Engagements to gain Mettle. Join parties as needed to help increase your participation rating and keep each other alive.
Return to Utya’s Aegis whenever you can rank up, which unlocks new areas, quests, and Lost Actions.
After Resistance Rank 2, Appraise Forgotten Fragments and put Lost Actions in your Holster so you can try them out. Lost Shell and Lost Protect have infinite charges, so they’re simple ones to experiment with.
After Resistance Rank 5, avoid taking the respawn teleport, instead calling in chat for a raise.
Attune to new Aethernet shards as soon as you can reach them (Resistance Ranks 5 and 8) for easy teleports.
At Resistance Rank 7, your quest (‘Third Time’s the Charm’) will take you to a location in the east of Old Bozja. Go there during the (Eorzean) daytime, since there are enemies there at night. Or, toggle ‘walk’ to get by without alerting them.
After Resistance Rank 10, keep an eye out for the Castrum Lacus Litore Critical Engagement, which is a big group dungeon kind of like an Alliance Raid, but with more flexible parties.
Can I Play Bozja Solo?
The short answer is kind of. Bozja is definitely much more solo friendly than Eureka was, but there are still obvious benefits to being in a party. I think it depends what your goals are and what discourages you from playing with others.
Do be very cautious around tougher level enemies; In Bozja, it doesn’t matter so much which zone you’re in (south, central, north). What matters is the difficulty level (I-V) of the enemy, next to their name. A level V enemy in the first area will still stomp you on your own. An enemy with a star next to their name is kind of like an A Rank or S Rank Elite Mark, and will need a prepared group to take down.
You can earn gold participation ratings in Skirmishes and Critical Engagements fairly easy on your own, and earn the Mettle you need to rank up. You can also travel everywhere you need to go for quests on a mount as soon as it’s open to you, and you don’t need an entourage to escort you anywhere.
However, there is safety in numbers. If you’re on your own then you won’t benefit from party heals, shields, or buffs. If you die, you’ll be reliant on extra observant players to notice a body on the battlefield, rather than your name in their party list.
If you aren’t grouping up because you don’t want to be tied to a group for an hour, you don’t have to worry. Many players join a party for a single Critical Engagement, then leave after. It’s not rude; the parties are a simple matter of convenience for keeping everyone alive and dealing damage.
The one exception might be Cluster Farms, where you should expect to put a little bit of time in with other players. Even then, the group won’t be forced to stop just because one or two people leave. Cluster farms are much more effective in a party, so trying to attempt one solo would be a little slow and boring.
If you’re not grouping because you don’t want to let people down and get yelled at, that’s not something I’ve seen here (except in Castrum). Unlike dungeons and trials, the group is often big, and really not reliant on any one player. Even if you die several times, the Skirmish or Critical Engagement will probably still succeed because there are usually multiple parties and many experienced players who know the mechanics.
At worst, I think you might have someone leave you on the floor for the remainder of the fight, but even then there are tools to keep MP high, and rewards for raising people, so most people really don’t mind picking you up.
If you’re sick of calling ‘LFG’ and not getting invites, there are a couple things you can try. First, if you play a Tank or Healer, be specific and say something like ‘LFG healer’. EVERYONE wants a Healer in their party for that extra survivability through unavoidable damage, and Tanks can also help with shields and mitigation.
If you’re playing DPS, you can still just start your own party. I’ll usually call ‘LFG’ twice, then assume parties are full and start inviting other people who ask. Just click the names of people in chat who ask for a group and invite ’em. Especially Healers. You have very little responsibility as a party leader; you can leave the party right after the fight and nobody will even blink. That’s for Skirmishes and Critical Engagements, though; In Castrum the Leader often has a little bit more responsibility than that.
Resistance Rank
While your Job level is synced at 80 within the Bozjan Southern Front and your combat ability is relatively constant, you will still level up your Resistance Rank, which gives you access to more Resistance Weapon quests, areas of the map, and Lost Actions (which can affect your combat ability). You’ll level up by earning Mettle.
Your current amount of Mettle is listed, along with how much you need to reach the next Rank. You don’t ‘spend’ your Mettle to rank up, it’s just a running total, and when you have more than the next threshold, you can increase your rank by speaking to the Resistance Commander NPC at [15.0, 30.4].
You cannot be ‘demoted’ and fall in Resistance Rank. Once you reach the highest rank (15) then you will be capped on Mettle at 703,200. If you lose Mettle then you can regain it to come back up to the cap, presumably in preparation for the next section of Bozja in a future patch.
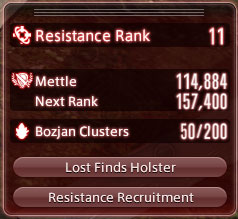
Starting at Resistance Rank 5, a small amount of Mettle DOES get consumed if you are incapacitated (reach 0 HP), and much more Mettle will be lost if you take the respawn teleport back to the base (Utya’s Aegis), rather than being raised. The amounts lost vary with your Resistance Rank. Expect a few hundred Mettle from a death, and one or two thousand from returning. Try to travel with others, and call for a rez. On the flip side, be kind and raise players you see nearby.
Side note: as extra incentive to be a team player, there are actually two sets of achievements and titles that you can earn by resurrecting people. ‘Good Samaritan…‘ is for resurrecting 200 people outside of your own party or alliance, while ‘Guardian Angel…‘ is a new title for resurrecting any players in Bozja 500 times. You can use any method of raising, so non-raising Jobs can still use Resistance Phoenixes or Lost Arise, both of which contribute to the achievements.
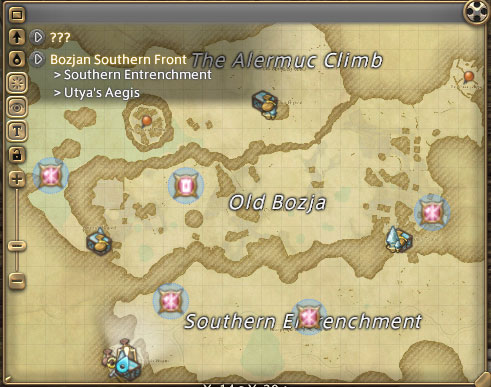
You earn more Mettle from Skirmishes and Critical Engagements in later areas. For example, the Skirmishes you have access to right away in the Southern Entrenchment will give you a few hundred Mettle, while the highest part of the map, The Alermuc Climb, will give the most Mettle per Skirmish, over 1000. The amount of Mettle you earn also scales with your Resistance Rank, which keeps your earnings relatively worthwhile, even if you go to help out with activities in the southern parts of the map.
Skirmishes
The meat of the content in BSF is the Skirmishes. These are actually very similar to the FATEs in the overworld, and have various scenarios other than just ‘kill the boss’. I’ve seen boss fights, hordes, item collection, and target destruction objectives so far. You’ll be rewarded with Mettle, which you need in order to level up your Resistance Rank. You’ll also get experience or Tomestones of Revelation (1 for silver rating, or 2 for gold rating) depending on your Job level.
If you’ve already cleared Castrum Lacus Litore, you’ll earn a Bozjan Coin for silver or gold participation. You may also receive one of the Memories required for the Resistance Weapon upgrades.
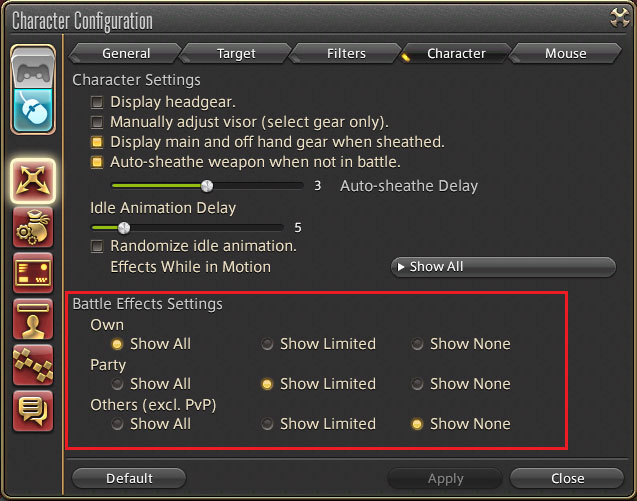
I highly recommend adjusting your Battle Effects Settings under System > Character Configuration > Character. I set my own effects to ‘Show All’, my party to ‘Show Limited’, and others to ‘Show None’. This helps tone down the chaos when you’re fighting in the field, and makes it easier to see more important visual cues. This is actually a setting that I prefer to use in general when configuring settings, because it helps in the overworld areas for FATEs and Hunt marks. I consider it especially helpful for content like Eureka and Bozja.
It’s easier to get credit towards Skirmishes when you have multiple people, so it’s always a good idea to join a party. Being in a party also means you’ve got people who can support you in combat more easily. Try to party with other players of similar Resistance Rank to you so you can all tackle your highest Skirmishes to keep advancing. Leave and join parties as you need. It’s helpful to make use of two chat commands here: /shout and /say.
/Shout will send your message to everyone in the instance. If you’ve just entered, you might type something like “/shout LFG R8”, which means “Looking for group, I’m Rank 8.” Someone of a similar level will likely invite you to their party, and then you can teleport to a nearby Aethernet shard and meet up with them.
/Say will send your message to only those players immediately around you. Use this if you’ve made your way to a Critical Engagement or Skirmish without a party, and want to join a party that’s also right there, waiting for it to start. A simple “inv please” or “LFG” will usually get you an invite from a party that has spots open.
If nobody responds to your requests for an invite, you can always start your own party by inviting others who ask. Right click their name in chat, and ‘Invite to Party’. There is no strict party makeup required, and due to the availability of Lost Actions, DPS are never totally helpless. Still, you should consider swapping to a Tank or Healer if you think your party or the larger group in general needs another one.
Critical Engagements
While Skirmishes can be a bit of a mindless grind, Critical Engagements are, well…more engaging. These play out more like the boss fights in an Alliance Raid, and each have their own mechanics to learn. You can earn Mettle and lockboxes from these, and either experience or Tomestones of Revelation (10 for a gold rating) depending on your level.
Some Critical Engagements may drop Forgotten Fragments, and if you’ve cleared Castrum Lacus Litore, you’ll earn 3 Bozjan Coins. You may also receive one of the Memories required for the Resistance Weapon upgrades.
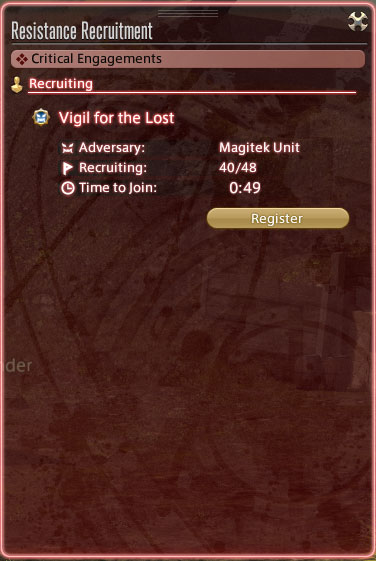
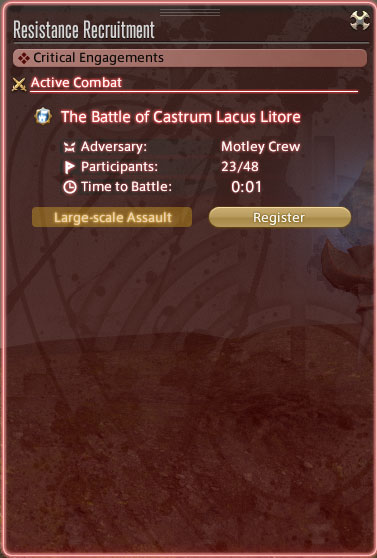
There are a limited number of spots available, usually 48, but sometimes 24, so be sure that you (or your party leader) register for one when it starts. There’s an audible bell chime when recruitment for one starts, and you’ll also see an icon on the button in the lower right of the screen.
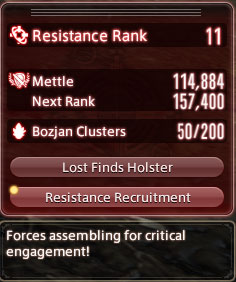
You can get priority to enter the Critical Engagement in a couple of different ways. First, there are a few particular Critical Engagements which require a specific Skirmish to be completed in order to trigger them. If you contributed in the Skirmish, you’ll get a buff called ‘Marching Orders’ which gives you priority in that upcoming Critical Engagement. You can see this buff in your Status Info (Other) section next to your food and FC buffs, with the name of the Critical Engagement.
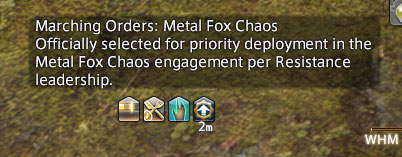
The second type of priority is bought with Bozjan Clusters from the Resistance Quartermaster at Utya’s Aegis. For 5 Bozjan Clusters you’ll get a priority buff that lasts 60 minutes, but is lost if you leave the instance. This buff is lower priority than the Marching Orders buff, but it’d be pretty rare that this makes a difference in whether you get into a Critical Engagment or not. As far as I’m aware, no priority buffs have an effect on your chances of being selected for a Duel.
After the recruitment phase, if you’ve been selected, the Register/Withdraw button will change to a ‘Commence’ button. Click on that to be teleported to the site of the Critical Engagement, with a 2 minute preparation period.
Kill It with Fire
Triggered by the Skirmish ‘All Pets Are Off’ in Southern Entrenchment
Quite likely the first Critical Engagement you’ll take part in. It’s fairly simple, with only a couple of mechanics to dodge. Drops Field Notes on Clarricie.
Dead Leaves – Stand in either a blue or pink section, and alternate colours with each subsequent cast. Your debuff bar shows which colour you were last hit with.
Playful Breeze – Raidwide damage.
Harvest Festival – Summons Rotten Mandragoras at the edge of the arena which send out pink hearts towards the boss. Avoid the hearts! They explode on contact in an AoE, damaging and inflicting Confuse, making you start attacking party members.
Splash Grenade – Stack up on the stack marker.
Splash Bomb – Avoid the player-targeted AoE markers.
The Baying of the Hound(s)
Southern Entrenchment
The boss is weak to physical attacks, so casters and healers can use Lost Steelsling to deal more damage. The hardest part of this fight is probably tracking the paths of the fireballs, especially if you have to dodge the earth AoE from Void Quake.
Void Tornado – Very high %HP raidwide damage. Heal everyone back up after.
Lava Spit – Summons three fire orbs (AoE markers) which get big and start spinning. The flame wheel indicates the direction each of them will travel across the arena. Stand behind or to the side to avoid them. Try to get behind one or two, then look across the arena and adjust for any far away.
Hellclaw – Tankbuster.
Hellpounce – Turns to jump towards one edge of the arena, then jumps across to the opposite edge. Damages anything in his path during jumps, so get away from the middle.
The Lion’s Breath – Fire attack in a cone towards the middle. Step to the sides.
The Dragon’s Breath – Lightning cone attacks towards his sides. Get in front of his middle head.
Tail Blow – Conal attack behind the boss. Harmless if he’s still got his back to the edge of the arena.
Void Quake – Earth AoE travelling from the perimeter of the arena to the center.
Vigil for the Lost*
Triggered by the Skirmish ‘More Man Than Machine’ in Southern Entrenchment
Basically a bullet hell minigame. Use Lost Spellforge to take advantage of the boss’ vulnerability to magic. Dodge the AoEs that are flying around. Essence of the Breathtaker or Lost Swift can help you move around faster.
Crippling Blow – Physical tankbuster.
Plasma Field – Raidwide damage.
Light Leap – Boss jumps to the center for AoE damage.
Area Bombardment – Towers followed by rotating perimeter AoEs. During subsequent casts, the perimiter AoEs will spiral closer and closer towards the center.
Magitek Ray – Magitek Bits around the edge fire line AoEs at random players during Area Bombardment.
Shockwave – Point blank AoE around the boss.
Tail Missile – Even larger point blank AoE around the boss.
*Duel – Avoiding all AoEs qualifies you for the ‘Aces High’ Duel after this Critical Engagement.
The Shadow of Death’s Hand
Southern Entrenchment
Have one tank on the 4th Legion Beastmaster, and one tank on the big bird, Akbaba. The Beastmaster should be killed first, since he continues to summon adds and heal Akbaba while he’s alive. There are a lot of knockbacks in this fight, and it can get a bit chaotic.
Broadside Barrage – Raidwide damage and sets up hazardous wind around the perimeter of the arena. Touching the perimeter puts a bleed effect on you.
North Wind (East Wind, etc.) – Huge knockback from the indicated direction, that can be avoided with Arm’s Length, Surecast, etc. Arrow markers will appear but they don’t give you a lot of time to adjust. Best to move to the cardinal direction named in the castbar. This attack also summons a moving whirlwind in the arena which knocks players back if they touch it.
Bestial Loyalty – The Beastmaster summons two Carrion Crow adds which should be picked up by any available tanks. Try to gather everything together so they can be hit with AoE attacks.
Reward – The Beastmaster heals Akbaba, which is one of the reasons why you want to kill the Beastmaster first.
Run Wild – Interruptable. The Beastmaster buffs his Tamed Carrion Crow adds.
Piercing Barrage – Line AoE from Akbaba.
Broadside Barrage – Wide knockback AoE in the direction Akbaba is facing. Stay close so you can get behind him.
Rolling Barrage – Point-blank AoE with a moderate cast time, but short visual indicator. Be ready to move away.
Hard Beak – Physical tankbuster.
Helldive – Akbaba will jump to a player with a stack marker.
Wrath of the Forsaken – After the Beastmaster is killed, Akbaba will give itself a damage buff.
The Final Furlong
Triggered by the Skirmish ‘Unicorn Flakes’ in Old Bozja
The main trick to this fight is the hand tether mechanic, which works kind of like the ghosts in Super Mario, where they move towards you if you aren’t facing them, and stop moving if you are. Healers, keep an eye on the NPC fighting alongside you, Llofii the Forthright. You can (and should) heal her, and she commands the Monoceros who destroys the hands with the blue AoE. Also, for the ‘Taloned’ attacks, you can either look at the name of the cast or which part of the boss is glowing.
The Grip of Poison – Raidwide damage.
Taloned Wings – The boss’ arms glow blue. Conal attacks on his sides first, followed immediately by conal attacks in front and behind. Move from one safe spot to the next.
Taloned Gaze – The boss’ front glows blue. Conal attacks in front and behind the boss, followed immediately by conal attacks to his sides. Move from one safe spot to the next.
Grasp of Rancor – Hands tether to players, and move towards them when the player looks away from the hand (purple tether). When the player is facing the hand, the hand stops moving (white tether). Adjust your facing to lure the hand into the center when the blue AoE hits, and it will destroy the hand.
Stab – Tankbuster.
The Steps of Destruction – Three sets of player-targeted AoEs.
Spite Wave – Stack marker.
The Hunt for Red Choctober*
Triggered by the Skirmish ‘Red (Chocobo) Alert’ in Old Bozja
You can use Lost Reflect to avoid damage during Choco Meteorain. Very handy if you’re not sure exactly where to stand, or if your healers are on the floor.
Choco Slash – Tankbuster.
Choco Meteor Impact – Stack marker.
Choco Meteoruption – AoE markers spawn on random players’ locations.
Choco Meteor Stream – Cross AoE with rotating perimeter AoEs. Move to a safe corner, then back to the middle. When the cross appears again, move to a corner that currently has a dark red circle. It will be a safe spot before the cross hits. Repeat once more while avoiding stack marker or player AoEs.
Choco Meteorain – Four sets of proximity AoEs and a stack marker. Move to one edge of the circle to avoid the first sets. Wait for the meteors to land before moving to the next spot around the edge, away from the next set of proximity markers.
Choco Meteor Strike – Line AoE + Arrow AoEs (a.k.a. ‘Exaflares’). Move to the side, right in front of the arrows. Avoid player AoEs by moving further away from the arrows and then back to the middle.
Choco Comet – Line AoE + Towers. Move to the side and split up to cover all the towers.
*Duel – Avoiding all AoEs qualifies you for the ‘Beast of Man’ Duel after this Critical Engagement.
The Fires of War
Old Bozja. Runs concurrently with ‘Patriot Games’
This fight is a 24 man Critical Engagement, and seems to be a lot less popular than ‘Patriot Games’, since everyone always registers for the latter, at least on my Data Center. Either way, this one is basically just a ton of adds, so it feels a lot like a Skirmish with extra mechanics. It’s even got a unique map symbol, because it’s the only Critical Engagement that is NOT just a boss fight. Having multiple tanks will make it easier, keeping aggro off of the squishier roles.
Pyroplexy – Towers appear around the arena. Have each tower covered by at least one player. The towers have a bright blue outline when someone is standing inside.
Wandering Flame – The flame orb in the middle will cast ring AoEs and point blank AoEs. While avoiding these, run around to each of the bombs with stack markers before they make it to the middle orb.
Hot Temper – A large flame monster will spawn and cast a proximity AoE. Identify the bomb furthest from him, and destroy it to create a safe spot to stand.
Slow Deflagration – The ‘boss’ will cast a slow enrage, while several of the previous mechanics happen simultaneously. On top of that, you must kill the tethered adds before you can damage the boss.
Patriot Games
Old Bozja. Runs concurrently with ‘The Fires of War’
A fairly straightforward fight. The boss is weak to magic, so give physical jobs the Lost Spellforge buff. Tanks should be ready to get rid of the mines, and all melee players should watch out for Searing Conduction, which doesn’t give them much time to move away from the boss.
Plasma Gun – Tankbuster.
Magitek Bartizan – Summons untargetable cannons around the edge of the arena, to be charged up with Electrochemical Transfer.
Electrochemical Transfer – Tethers to cannons around the edge of the arena. Each tether puts adds one charge to a cannon, and the cannons fire in a straight line at two charges. Check the red lights above the cannon to see how many charges it has.
Lightning Rod – Three mines will be buried around the arena. Have tanks clear out the mines by walking over them. If they are left alone, they will explode dealing raidwide damage and applying a vulnerability stack.
Firing Orders – Large circle AoEs.
Neutralization – Conal attack to one side.
Electrifying Conduction – Raidwide damage.
Searing Conduction – Large point-blank AoE. Move out immediately, it comes out fast.
Trampled Under Hoof
The Alermuc Climb. Runs concurrently with ‘Where Strode the Behemoth’
This is a 24 man Critical Engagement. It seems to be significantly less popular than the other one that runs alongside it, ‘Where Strode the Behemoth’. I have only seen it cleared once in person, because usually not enough people register for it.
This Critical Engagement rewards you with 10 Forgotten Fragments of Resolve for completing it.
Where Strode the Behemoth
The Alermuc Climb. Runs concurrently with ‘Trampled Under Hoof’
The main mechanics of this fight involve the corpses scattered around the arena. You’ll need to watch these Bestial Corpses when they’re raised, and dodge their conal attacks. You’ll also need to hide behind a corpse at times to survive the classic Behemoth meteor attack.
Wild Horn – Tankbuster.
Zombie Bile – Circle AoEs which always land on two or more Bestial Corpses. The corpses will stand up and fire a huge conal AoE in front of them, then fall back down. Run to a safe spot, usually behind or to the side of one.
Wild Bolt – Raidwide damage.
Blazing Meteor – Raidwide death. Hide behind one of the corpses in the arena to survive.
Zombie Breath – The boss will turn and fire an AoE in front of him, This raises a Bestial Corpse which fires another thunderbolt cone.
Rise of the Robots
Triggered by the Skirmish ‘I’m a Mechanical Man’ in The Alermuc Climb
The boss is vulnerable to magic, so use Lost Spellforge on physical jobs to deal magic damage.
Basic Training – Front and back conal attacks that damage and knock you back. He spins in the direction of the arrows, so stay on his sides and rotate around him until he stops blasting.
Incinerate – Raidwide damage.
Order – Gives you a debuff which indicates a forced march in a specific direction (relative to where your character is facing). You’ll march about half the distance of the arena, so aim to land in one of the bubbles that will add the correct value to your HP to give you the desired number.
Divide by Three, Divide by Four, etc. – The boss adjusts your HP to be a single digit. Your new HP needs to follow the rule in his castbar. Standing in one of the bubbles adds that value to your current HP. Remember you will be doing a forced march from Order, so plan where you want to go. Depending on your HP, you may not need to be in a bubble to satisfy the castbar rule.
Train – Same rotating conal attack as Basic Training in the beginning, but this one lasts longer.
Metal Fox Chaos*
Triggered by the Skirmish ‘Of Steel and Flame’ in The Alermuc Climb, which begins with the Skirmish ‘Of Absent Friends’
Like most mechanical bosses, this one is also weak to magical attacks, so bring Lost Spellforge if you want your physical jobs to deal extra damage. The main mechanic of this fight is the reflector bits lined up around the edge of the arena. The bits reflect the boss’ attacks when hit, firing in straight lines across the field. These reflections will activate another set of reflector bits. Keep an eye on where the boss is launching his attack, and in what order the reflector bits will be struck.
Diffractive Laser – Wide conal AoE towards one side of the arena. Activates reflector bits. Stick close to the boss and rotate around into the safe quadrants.
Laser Shower – Circle AoEs on one edge of the arena. Activates reflector bits. The ones hit first and the ones hit last have opposite AoEs, so you’ll stand kind of towards the side with the AoEs, then sidestep into the spot where the first reflectors fire.
Satellite Laser – Raidwide damage. Activates all reflector bits at once. Find a safe spot by lining up in front of an empty space in both directions. Look for the gaps in the lines of reflector bits.
Rush – Jumps towards a random player with a rectangular AoE. Getting hit by this does not disqualify you from the duel.
This Critical Engagement rewards you with 10 Forgotten Fragments of Resolve for completing it.
*Duel – Avoiding all AoEs qualifies you for the ‘And the Flames Went Higher’ Duel after this Critical Engagement.
Duels
Duels are special 1v1 Critical Engagements that you must qualify for in order to register for them. You qualify by completing a specific Critical Engagement without dying or obtaining any vulnerability stacks, which you get from being hit by most avoidable AoEs. Essentially, you have to execute the Engagement’s mechanics perfectly, and then you’ll be eligible for a one on one Duel.
If you successfully complete all three Duels and earn their achievements, you’ll get the achievement ‘Close Encounters’ and earn the title of ‘Sword of the South…‘.
Hunting For Duels
I’ll try to give some tips for efficiently tracking down these Duels, but ultimately you will be at the mercy of the RNG to pick you over everybody else who qualifies.
The first thing you’ll want to do is spawn the Skirmishes that trigger the relevant Critical Engagement for the Duel. These Skirmishes only appear after killing a sufficient amount of Magitek enemies in that area. So, if you’re looking for Red (Chocobo) Alert, you’ll want to go to Old Bozja and start slaying enemies whose names say ‘4th Legion [machine type]’. In a well populated instance, usually this will happen naturally as people do Cluster Farms.
You’ll also need to keep in mind that there’s a timer on each Critical Engagement (and its prerequisite Skirmish). If the Lyon Duel just happened (whether successful or not), the Chocobo Skirmish won’t spawn for about an hour, even if you kill a bunch of Magitek enemies.
Try to find an instance that’s new. Leaving and re-entering can put you in different instances, and if you queue with a group, it’s a little more likely that you’ll land in a sparser, newer instance than one that’s nearly full already. A fresh instance should have most of its duels available soon, and even a small number of competent players can kill enough Magitek enemies and win the Critical Engagement.
You can check the remaining time on players in the instance by typing ‘/sea’ or going to Social > Player Search > Adventurer List and sorting by Time Remaining. Everyone starts with 180 minutes when they load into the instance, so if the oldest player still has 170 minutes left, you know it’s a really new instance.
Another tip is to try to look for Duels while other players are fighting in Castrum. This cuts your competition for the Duel spot roughly in half, since fewer players will be on the Bozja map and participating in Critical Engagements.
Finally, come prepared for the Duel! Nothing sucks worse than losing that 1v1 and having no idea when you’re going to get your next attempt. Spectate other players who fight the Duels to see the mechanics, or watch a video guide. Mrhappy has completed all of them and put out some concise guides for each of them which I’ll link below.
It’s a good idea for all Duels to have Manawall available, as well as a damage increasing Essence like Martialist, Aetherweaver, Skirmisher, Bloodsucker, Beast, or Templar. The Deep Essence versions are more potent, but rarer. You will also probably want to use a Resistance Reraiser just in case you slip up; This item can give you a second chance (and a third or fourth if you’re really lucky).
Aces High
Complete the Critical Engagement ‘Vigil for the Lost’ in the Southern Entrenchment without any vulnerability stacks
Defeat Gabriel for the achievement ‘Missing an Angel’ and the title ‘Gabriels’ Downfall…‘
Recommended Lost Finds are Manawall and anything to increase damage.
Mrhappy’s video guide.
Beast of Man
Complete the Critical Engagement ‘The Hunt for Red Choctober’ in Old Bozja without any vulnerability stacks
Defeat Lyon the Beast King for the achievement ‘Lyon’s Share’ and the title ‘Queller of Beasts…‘
Recommended Lost Finds are Manawall, Dispel, and anything to increase damage.
Mrhappy’s video guide.
And the Flames Went Higher
Complete the Critical Engagement ‘Metal Fox Chaos’ in The Alermuc Climb without any vulnerability stacks
Defeat Sartauvoir quo Soranus for the achievement ‘Burn Baby Burn’ and the title ‘…The Death of Flame‘
Recommended Lost Finds are Manawall, Swift, Resistance Medikit, and anything to increase damage.
Mrhappy’s video guide.
Castrum Lacus Litore
Once you reach Resistance Rank 10 and progress the Resistance storyline, you’ll be eligible to register for the Critical Engagement ‘Castrum Lacus Litore’, often just referred to by players as ‘Castrum’. It’s a large-scale assault, very similar to an Alliance Raid, with a bit more of a Dungeon feel. I’ve heard that it only spawns when there are enough eligible players in the instance, and only about once per hour.
Everyone seems to prefer /yell to communicate while in here, which is the yellow text with a range in between /say and /shout. It makes sense, since you may be separated from other players within the Castrum that are too far for /say to reach, but /shout still goes out to everyone in the entire Bozjan Southern Front.
You’ll want to complete Castrum to progress your Resistance Weapon questline (be ready for some cutscenes after you clear it). You’ll also earn Bozjan Coins which you can use to purchase the i495 Bozjan Armor sets at Utya’s Aegis, and depending on how well you do in the ‘dungeon’ part of the instance, you’ll earn high rank Forgotten Fragments, only obtainable here. I guess you can always buy them from the marketboard, but the point is, they’re much more scarce.
Delubrum Reginae
Once you progress the Bozja questline to ‘Fit for a Queen’ you’ll be able to queue for the Delubrum Reginae large-scale assault from speaking to Sjeros in Gangos. You can queue up as any Role you like, and you’ll be automatically placed in a party when you zone in, similar to an Alliance raid.
Unlike an Alliance Raid, you can leave and rearrange your parties within the instance, sorting yourselves as needed, though you are still committed to the Job you queued as. You’ll see a Lost Finds Cache before you reach the first fight, so you can adjust your Holster as needed in case you have to switch up your responsibilities.
If each party has a Tank and Healer you should be good to go. If your party is lacking in one area, consider bringing Lost Finds that make up the deficit. For example, Lost Arise or Resistance Phoenixes can help a lot if your party only has a single Job able to raise other players. Lost Bravery, Lost Font of Power, and Aetherweaver Essence are easy ways to increase damage output if your party lacks for DPS roles.
If you choose to use Irregular Essence as a Tank, let your party know! You will rely on Healer support to keep you alive through raidwide damage. It’s easy enough for a skilled Healer to keep a single Irregular Tank alive through the use of shields and mitigation, as long as they don’t take avoidable damage.
Personal Spoils
Just like in Castrum Lacus Litore, the Treasure Chests within this duty are personal loot dropped directly into your inventory. Make sure you open each Treasure Chest of Personal Spoils after every fight! You can find Bozjan Silver Coins, Forgotten Fragments, Field Notes, or Orchestrion Rolls.
Traps
One player leading the way between bosses with Lost Perception is enough to avoid any annoying traps. The traps are quite large and there are two types: a damaging trap and a poison trap. The poison can be resisted with Essence of the Breathtaker, or Esuna’d off. I’ve never seen it deal enough damage to actually kill a player.
The damaging trap will probably kill anyone except a full health Tank. Be ready to rez players between fights if they aren’t paying attention to where they’re walking.
Lost Finds
Once you reach Resistance Rank 2 you’ll unlock Lost Finds, which include both Lost Actions and Items. This system is very similar to the Logos Actions back in Eureka, except you unlock them very early on here, which is great.
The number of Lost Finds can be intimidating at first; there are so many of them that you may be overwhelmed. I have to say, though, that they are a ton of fun to play around with and let you do some helpful and unusual things.
Forgotten Fragments
You’ll find Forgotten Fragments by defeating enemies and completing Skirmishes and Critical Engagements, and you can then have them appraised by the Resistance Appraiser next to any Lost Finds Cache, denoted by a blue chest on the map. These are at every Aethernet location. You can also buy and sell unappraised Fragments on the Marketboard.
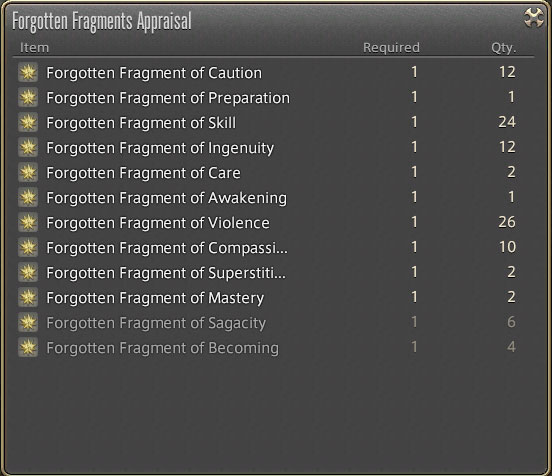
Appraising 1000 Forgotten Fragments will give you the achievement ‘Lost and Found IV’, and let you claim the Bozjan Earring from Jonathas in Gridania. This earring gives you a 10% exp boost below level 80, so it helps fill that gap of 71-80 that the Aetheryte Earrings don’t cover. It also gives you +3 Haste while inside Bozja.
There are many different types of Fragments, each with its own list of actions it may contain when appraised. The Fragment description will state the possible actions, as well as what Resistance Rank you need in order to have it appraised. Low rank Fragments are obtained from enemies in the easier south areas of the map, while higher level Fragments come from the higher rank areas as you travel north. Especially high Fragments (Rank 11+) are dropped from Castrum Lacus Litore.
Someone made a very organized Forgotten Fragments Table that’s great to use as a quick reference for where to go for more Fragments if you need a specific Lost Find. It doesn’t list drop rates or rank requirements, so if you need those I’ve listed the ranks here, and linked to another reference chart in the drop rates section below.
Resistance Rank 2
Fragment of Caution – Manawall, Stealth, Protect, Shell, Cure, Cure III, Incense.
Fragment of Preparation – Phoenix, Potion
Fragment of Skill – Aetherweaver, Martialist, Savior, Veteran, Platebearer
Resistance Rank 5
Fragment of Ingenuity – Paralyze III, Banish III, Dispel, Spellforge, Steelsting, Swift
Fragment of Care – Reraiser, Potion Kit, Ether Kit
Fragment of Awakening – Guardian, Ordained, Skirmisher, Watcher, Profane, Irregular, Breathtaker
Resistance Rank 8
Fragment of Support – Reflect, Stoneskin, Bravery
Fragment of Violence – Focus, Slash, Death
Fragment of Resolve – Noble Ends, Honored Sacrifice, Tireless Conviction, Firm Resolve, Solemn Clarity, Honed Acuity
Fragment of Compassion – Cure II, Cure IV, Arise, Medkit
Resistance Rank 10
Fragment of Observation – Perception
Resistance Rank 11
Fragment of Superstition – Bloodsucker, Beast, Templar
Fragment of Mastery – (Deep) Aetherweaver, Martialist, Savior, Veteran, Platebearer
Resistance Rank 12
Fragment of Sagacity – Font of Magic, Font of Skill, Font of Power
Resistance Rank 13
Fragment of Becoming – (Deep) Guardian, Ordained, Skirmisher, Watcher, Profane, Irregular, Breathtaker
Fragment of Deception – (Pure) Gambler
Resistance Rank 14
Fragment of Transcendence – (Deep) Bloodsucker, Beast, Templar
Fragment of Loss – Sacrifice
Resistance Rank 15
Fragment of Caprice – Fair Trade, Mimic, Dynamis Dice
Fragment of Clarity – (Pure) Elder, Flare Star
Fragment of Contention – (Pure) Duelist, Rend Armor
Fragment of Finesse – (Pure) Fiendhunter, Dervish
Fragment of Fortitude – (Pure) Indomitable, Aethershield. From first boss
Fragment of Divinity – (Pure) Divine, Seraph Strike.
Forgotten Fragment Drop Rates
There are special enemies around Bozjan Southern Front with a star symbol next to their name. These are kind of like S rank monsters, and reward you with a large number of Forgotten Fragments for defeating them. They drop a specific Fragment type depending on which of the three zones they’re located in. The three types of Fragments are Caution, Ingenuity, and Violence for the south, central, and north areas respectively.
If you’re interested in farming particular Fragments, someone has posted charts listing the map’s enemies, locations, and drop rates. I went out to try a few of the 100% drop rate enemies to see how viable farming Fragments was. I will note that some of the ones listed there say a specific number, but from my experience it’s more of a range, with that number being the maximum.
Here are some of the more convenient ones I tried to tackle. They get more and more difficult the further north you go, obviously, but also the higher the number next to the mob’s name. I wouldn’t recommend soloing ‘IV’ or ‘V’ marked enemies without first preparing some good buffs with your Lost Finds.
Fragment of Preparation x2 – Bozjan Geshunpest [24, 29, Night] east of Utya’s Aegis
Fragment of Skill x1-3 – Bozjan Matamata [31, 26] southeast of Olana’s Stand.
Fragment of Care x1-2 – Bozjan Wight [24, 21, Night] northwest of Olana’s Stand.
Fragment of Awakening x1 – Bozjan Taipan [16, 24] east of Lunya’s Stand.
Fragment of Violence x1 – Bozjan Gravekeeper [19, 17, Night] west of Camp Steva.
Lost Actions and Items
There are many different actions and items available only within Bozja and its associated duties Castrum Lacus Litore and Delubrum Reginae. These actions will grant you various beneficial effects which may enhance your Role’s traditional strengths, or allow it to perform more similarly to a different Role. Some Lost Finds may only be used by specific Roles, and a few of the items may only be used within Delubrum Reginae.
Once you obtain one for the first time, its tooltip can always be viewed in your Lost Finds Cache. u/Hanakoneko on reddit has shared an organized and updated spreadsheet detailing the effect of each Lost Find, as well as which Fragment to appraise to obtain it and which Roles may use it.
Lost Finds Cache and Holster
Once appraised, you’ll add the action to your Lost Finds Cache. You can hold up to 200 of each Lost Find in the Cache, and can assign them from your Cache to your Holster to carry with you.
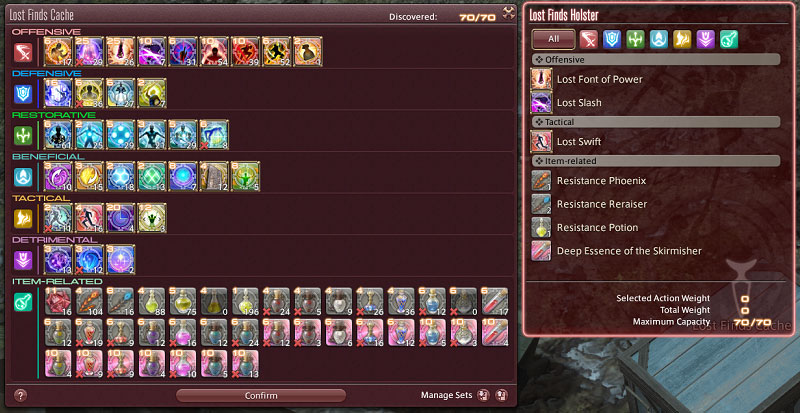
Each action has a ‘weight’, seen at the top left corner of the icon, and weight limits how many actions you can hold in your Holster at once. You start with a capacity of 30 units, but every Resistance Rank you earn will increase your maximum a little bit, up to the maximum of 70 units at Resistance Rank 15. Check back in as you rank up to see what else you have space for in your Holster, and save new sets.
It takes a little getting used to, but the save and load set buttons allow you to fill your Holster with your preferred set of items and actions. This is handy if you’ve consumed some of the Lost Finds you were holding and want to quickly stop by a Lost Finds Cache to refill your Holster. Not all Lost Finds can be used by all Jobs, so saving different sets for different Jobs will make sure that there’s no wasted capacity in your Holster, holding onto a Lost Find you can’t even use. You can also rename your sets by right clicking them in the save/load sets window.
When in combat, I try to keep my Holster open so I can easily click on items, but you can also drag these items from the Holster to a Hotbar for easier use.
The Lost Actions can be assigned to two Duty Action slots. If you haven’t already done so while customizing your hotbar keybinds, I recommend setting up keybinds for Duty Actions. Go to System > Keybinds > Hotbar, and the two Duty Action slots will be at the very bottom. Alternatively, you can drag and drop the Duty Actions from your Actions & Traits menu onto your hotbars. The two actions can be found under the General tab.
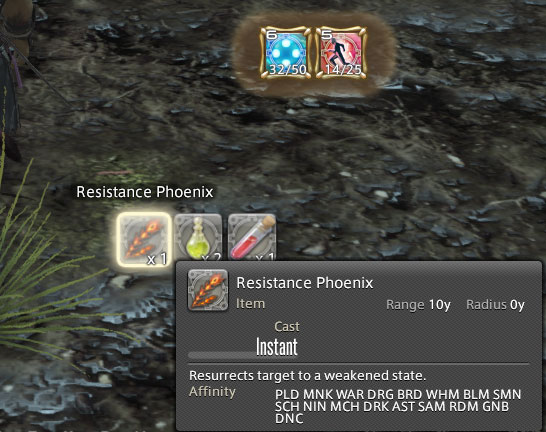
You can see what Lost Actions someone currently has prepared in their Duty Actions by hovering over their ‘Reminiscence’ buff on their buff bar. Use this to check what they’re using at the moment. To the right of Reminiscence will be their Essence buff if they’re using one.
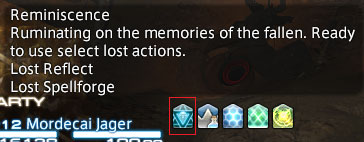
You don’t usually need to worry about these, but do keep an eye out for Essence of the Irregular on Tanks, since it means they probably won’t be doing any tanking, and they may even need help to survive raidwide damage!
Let Me Holster That for You
After you complete Delubrum Reginae for the first time and finish the ‘Fit for a Queen’ quest, you’ll be able to unlock this new quest in Gangos that expands the size of your Lost Finds Holster by 10 capacity up to a new maximum of 80.
Early Tips for Lost Finds
Personally I was a little overwhelmed by the number of Lost Finds when I first started, so I’ll try to give some tips for starting out. I’ll list some of the most useful Lost Finds you have access to from the beginning at Resistance Rank 2.
All Jobs can make use of Protect and Shell, and they have infinite uses. Try those out to start, and give your allies some long-lasting physical or magical mitigation. You can cast these abilities on players outside of your party as well.
Swift is also usable by everyone, and greatly increases your movement speed for 10 seconds. If you’re unfamiliar with a fight, this can help you reposition quickly to avoid some huge AoEs, which are common in Critical Engagements.
The Resistance Phoenix can be useful on non-raising Jobs in a last-ditch attempt to prevent a wipe. I always try to keep at least one on me when I play Tank or DPS so I can get a Healer/Red Mage up to start raising everyone. For a similar reason, consider taking Cure III to offer some help healing the party in an emergency.
For the Lost Items labelled ‘Essence of…’ or ‘Deep Essence of…’, you can only have one active at a time, and the buff lasts indefinitely when used. However, if you change Jobs or leave the instance of The Bozjan Southern Front, you will lose it. Fragments of Skill are relatively easy to get, so it’s nice to have some kind of Essence active at all times; Just be mindful not to completely waste them if you plan on switching Jobs a lot while in the instance.
Aetherweaver and Martialist respectively allow Healers and Tanks to deal more damage.
Savior allows Tanks, Melee, and Ranged to be more effective with healing. These are good to combine with one or more of the Lost Cure Actions if your party lacks a Healer.
Veteran gives Healers and Casters stronger defenses, while Platebearer does the same, but for Melee and Ranged. These Essences can be combined with Lost Incense for a makeshift Tank if your group doesn’t have one.
Remember that changing Jobs within Bozja removes all your Essence and Deep Essence effects, but your assigned Duty Actions remain the same. They simply become unusable if they aren’t allowed by your new Job. Use another Lost Action from your Holster to replace the one on the Duty Action.
Pure Essences
There are some Lost Finds that can only be used within Delubrum Reginae. These items are the Pure Essences, and you’ll need to be Resistance Rank 15 to appraise the appropriate Forgotten Fragments for them. There is one Pure Essence for each Role: Caster DPS, Melee DPS, Physical Ranged DPS, Tank, and Healer. Each Pure Essence gives a mix of defensive and offensive stats, as well as a hidden effect.
According to u/Zanzargh in a reddit comment, the hidden effects are that each Pure Essence interacts with a specific Lost Action to give an extra bonus.
Pure Essence of the Elder augments Lost Cure IV to additionally give the affected players a 1 minute Lost Bravery buff, increasing damage dealt.
Pure Essence of the Duelist augments Banner of Honored Sacrifice to drastically reduce the HP drain suffered by the user.
Pure Essence of the Fiendhunter augments Lost Cure II to additionally give the target Refresh (MP restoration) at the cost of a Slow debuff.
Pure Essence of the Indomitable augments Lost Sacrifice so there’s a high chance the user does not receive the Doom debuff.
Pure Essence of the Divine augments Lost Arise to give it a chance to succeed even within Delubrum Reginae (Savage), where players cannot be raised in the traditional manner.
Cluster Farming
You’ll probably see a lot of people shouting ‘LFG cluster farm’ or some equivalent. What is that? It’s a group of players who are rounding up and slaying groups of magitek enemies on the field. These are the enemies whose names are ‘4th Legion…’ and they drop Bozjan Clusters instead of Forgotten Fragments. Within each area of the map, the drop rates get higher for the higher level enemies.
In the Southern Entrenchment for example, the 4th Legion Roader and 4th Legion Death Claw are level III, so while they’re tougher, they’re also more likely to drop a cluster than the 4th Legion Slasher (level I). Most farming groups just round up all the magitek enemies regardless of level and AoE them down.
A solid farm is really easy to set up. You’ll want a Tank, preferably with Bloodsucker. If you don’t have that Essence, then either Guardian or Martialist are ok. You’ll probably also want at least one Healer or anyone with Lost Cure actions for emergencies. Then just stuff as many DPS Jobs in there as you want, or have another party member (preferably another Tank) pull magitek enemies from further away (the chase range on mobs in Bozja is pretty far) to the main group.
Remember that Lost Spellforge will come in handy for your Tanks and other physical damage Jobs, since 4th Legion enemies are more vulnerable to magic attacks.
If you have a full party you can even split up into two groups and farm different spots at the same time. While in Bozja, you get rewards for anything your party members are doing, regardless of where you are. Often I’ll get a random notification of a memory, cluster, or fragment being dropped into my inventory when I wasn’t fighting anything. Keep in mind that you have a chance of getting different memories dropped from enemies in different areas, so consider that when choosing a spot.
With enough people, everything will melt, but if you have extra resources, then increasing damage output can still speed up the process. Essences like Aetherweaver and Skirmisher are nice to have on, and Lost Slash or Banner of Noble Ends are good for high burst damage.
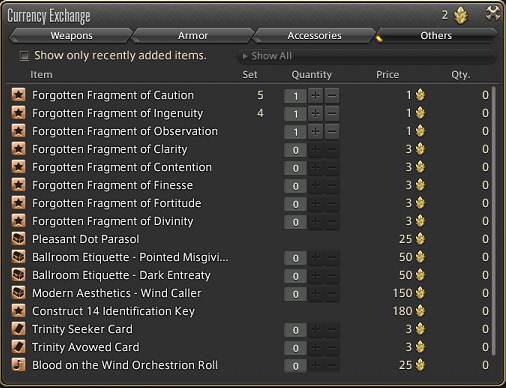
You can spend your Bozjan Clusters on priority status for entering Critical Engagements, various cosmetics, and select Forgotten Fragments. All of these are obtained from the Resistance Quartermaster at [14.2, 29.7].
What Kind of Rewards Can I Get from Bozja?
Resistance Weapons
Much like Eureka, the Bozjan Southern Front has its own compelling storyline, and it’s also how you earn and upgrade your Relic Weapon for the expansion. You’ll continue the Resistance Weapons questline through the BSF, and if the weapon is what you’re after, you’ll want to make sure to hop out of BSF back into Gangos to do the short sidequest ‘A Sober Proposal‘.
For Want of a Memory
Then you can pick up the repeatable quest ‘For Want of a Memory‘ from Zlatan at [6.1, 4.9] in Gangos. You’ll receive the weapon for the Job that you were on when you accepted the quest. You can abandon and pick up the quest again on a new Job.
That quest will let you start earning ‘Memories of the Dying’ tokens to upgrade your weapon to the next stage. Remember to retrieve materia on your weapon before you turn it in for an upgrade! There are three types of tokens, and you’ll need 20 of each. As long as you’ve accepted the quest, you can earn tokens. You don’t have to be using the same Job that you took the quest with.
The tokens have a chance to drop when defeating enemies, or completing Skirmishes and Critical Engagements. The fastest way to collect these inside Bozja is to join Cluster Farms. If you’re only hopping from Skirmish to Critical Engagement to Skirmish, you’ll collect them relatively slowly. Cluster Farms in my opinion are way more boring than the FATE-like activities, but they’re undeniably more effective at collecting memories quickly. Such is FFXIV.
You’ll get a different type of token from different areas of the map:
Tortured Memory of the Dying – The Southern Entrenchment (Available at Resistance Rank 1+)
Sorrowful Memory of the Dying – Old Bozja (Available at Resistance Rank 5+)
Harrowed Memory of the Dying – The Alermuc Climb (Available at Resistance Rank 8+)
Alternate Methods
It’s important to note that there’s an alternate way to earn these tokens, which is by completing FATEs in the Heavensward zones, which are each guaranteed to drop a token if you achieve a gold rating for your participation.
This alternate method is much faster! If you just want to quickly move on with your weapon, it’s definitely easier to join a FATE farming party in the Heavensward zones to rack up tokens quickly.
Tortured Memory of the Dying – FATEs in Coerthas Western Highlands and The Sea of Clouds
Sorrowful Memory of the Dying – FATEs in The Dravanian Forelands and The Churning Mists
Harrowed Memory of the Dying – FATEs in The Dravanian Hinterlands and Azys Lla.
Side note: beware of special achievement FATEs in Heavensward zones. These are boss FATEs that are much more difficult than usual, and have an Achievement (and possibly item drops) associated with them. You’ll notice them by the special boss music and the fact that they have way more HP than other boss FATEs in the zone. For example:
Coerthas Western Highlands – ‘We Fought a Dzu’
The Dravanian Forelands – ‘Special Tarasque Force’
The Dravanian Hinterlands – ‘Metal Gears Revengeance 2’
Doing these special FATEs takes longer, and you’ll definitely want a decent amount of people to help. On the plus side, you get Achievements!
The Will to Resist
The next step of the Resistance Weapon involves collecting more memory tokens, called ‘Bitter Memories’. If you don’t want to do it all in Bozja, there’s another quick alternate method: running synced level 60 dungeons or the Levelling Roulette (once per day). You only need 6 for this step, so it’s not so bad.
Note that you can have this step active on one Job and ‘For Want of a Memory’ active on a different Job, so you can earn different kinds of tokens at once. You can also earn more tokens than you need, and save them to use on a different Job’s weapon.
Armor Sets
Bozjan Armor Set (i495)
If you’re high enough rank to enter Castrum Lacus Litore, you can earn Bozjan coins and spend them to buy Bozjan Armor from the Resistance Supplier at [15.2, 29.9] at Utya’s Aegis. These are ilvl 495 pieces which look pretty cool. A full set for one role will cost you 98 Bozjan Coins.
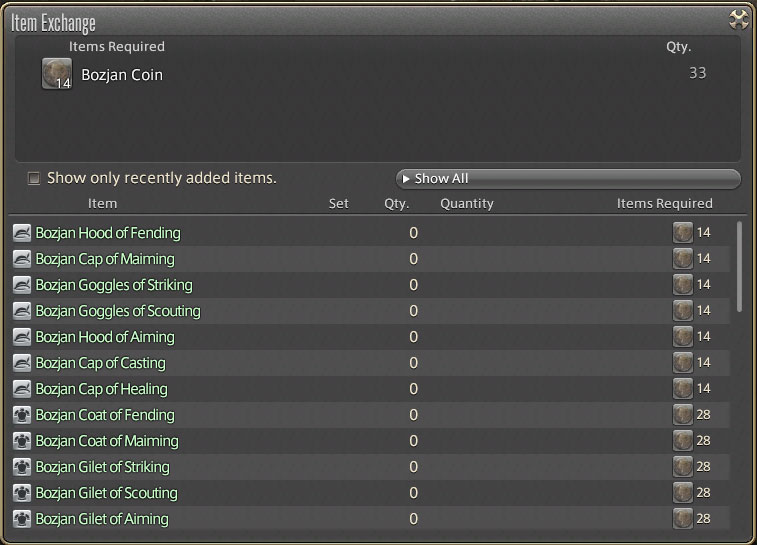
After you complete the Bozja story with your first run of Castrum Lacus Litore, a Bozjan Coin will also drop from Skirmishes that you earn silver or gold participation in. This was added midway through patch 5.35 and now players are able to go in and farm coins regardless of the Castrum timer in that instance.
You can also earn coins by trading in extra Field Notes to the Resistance Historian [15.0, 29.1] under ‘Field Notes Exchange (Other)’. You’ll earn more regular Bozjan Coins for Field Notes from the Bozjan Southern Front, and Bozjan Silver Coins for Field Notes from inside Delubrum Reginae.
The armor can be augmented with more coins to provide some Haste while wearing them in Bozja, and both the regular and augmented sets can be dyed. To be honest, I don’t think the augmented pieces are worth farming for. The only benefit you get is Haste within Bozja, and it’s completely unnecessary to clear the content. You’ll be perfectly fine without it, and the augmentation materials are just way too expensive.
Law’s Order Set (i510)
The Law’s Order Set is bought from the Resistance Supplier in Gangos [5.7, 5.1] using Bozjan Gold Coins. It’s item level 510 and has five materia slots.
You get three Gold Coins by completing the weekly repeatable quest ‘One Man’s Relic’ from Annes at Gangos [6.2, 5.4]. This quest is available after completing the Resistance Weapon questline up through ‘Fit for a Queen’, and you’ll get your three coins by running Delubrum Reginae at least once per week.
You’ll need 12 Bozjan Gold Coins to buy a full set, so four weeks of the quest. Personally I don’t care for the aesthetic of these heavily armored sets on anything but Fending and Maiming, and you also can’t dye them until you augment the pieces.
Cosmetics
There are a number of exclusive cosmetics available on the Bozjan Southern Front, including an emote, hairstyle, and mount, which can be purchased from the Resistance Quartermaster at [14.2, 29.7]. You’ll buy them using the farmable Bozjan Clusters which drop from various 4th Legion monsters around the map.
Typically there’s at least a few people on the Bozjan Southern Front who will be interested in farming clusters, and you’ll usually want to do this with a group for extra safety and speed.
There are also lootboxes in The Bozja Southern Front called Southern Front Lockboxes, which drop from Skirmishes and Critical Engagements. The Lockboxes can also be obtained from the Resistance Historian [15.0, 29.1] in exchange for any duplicate Field Notes you collect. Field Notes obtained from inside Delubrum Reginae are worth more lockboxes.

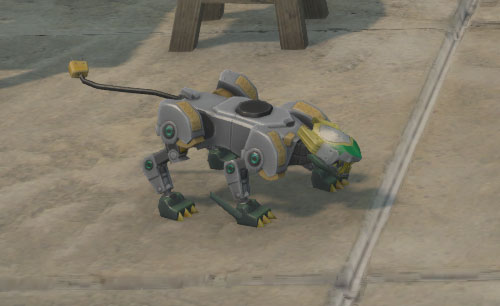
You can have the Lockboxes opened by the Resistance Locksmith located at [15.1, 29.8] near the main Aetheryte. For the most part you’ll get junk like combat Materia and Magicked Prisms (fireworks), but there are some rarer cosmetic items like glowing weapons, furnishings, a parasol, orchestrion roll, old trial bardings, a minion, and a mount.
Experience vs Tomestones
As mentioned earlier, depending on whether your current Job is level 80 or not, Skirmishes and Critical Engagements will reward you with either combat experience or endgame Tomestones. You can switch Jobs while you’re in the instance, but only if you are not currently in combat or inside a Critical Engagement.
I wouldn’t go out of my way to farm Tomestones with this content, since you only earn a small handful at a time. Still, it’s nice to know that if your primary focus is BSF then you won’t have to worry quite as much about getting your weekly capped Tomestones with tons of playtime outside of that content.
The experience gains are pretty good if you’re using the Bozjan Southern Front for levelling from 71 to 80. It’s not a bad way to spend those last 9 levels, especially since you’re synced up to level 80, so you also get to use more actions than you might normally have, kind of like how Heaven on High or Palace of the Dead work for earlier levelling.
If you’ve got the achievement for appraising 1000 Forgotten Fragments, make sure to claim and equip the Bozjan Earring for bonus experience outside of Bozja, and a bit of Haste inside it.
Summary
I highly, highly recommend checking out The Bozjan Southern Front, whether you have a group beforehand or not. Even if you hated Eureka, there are enough quality of life improvements here that it does not feel like as much of a slog as Eureka was. I also couldn’t get into the Eureka storyline, and will probably have to go back and rewatch it at some point. Bozja on the other hand, had me hooked from the start, and there are some exciting cutscenes to look forward to.
I’ll continue to update this post as I explore more of the content. I definitely want to mess around with more Lost Finds and see what applications they can all have. Each Critical Engagement also has its own tricks to success, and Field Notes to drop, so that’s another attractive task for completionists to tackle.
I hope you’re having lots of success on The Bozjan Southern Front. Leave a comment if you’ve found any really useful tips or tricks so far. Helping other players climb just means more opportunities to run Castrum!
As usual another excellent guide – very much appreciated!!! Thanks for all you do! =)